
How to take the perfect photo with less shots & Nokia Pro Cam
Digital Photography is hard, it involves so many hardware & software inconsistencies that make learning it, a very time consuming job.
Luckily Nokia’s hardware is the best out there for “mobile” digital photography so the rest will be up to the software or what Nokia calls it:
Nokia Pro Cam:
![2112-11e07629_680_400[1]](http://mynokiablog.com/wp-content/uploads/2013/08/2112-11e07629_680_4001-300x176.jpg)
It comes preloaded on the Lumia 1020 and just got released to all Lumia 92x phones that have the “Amber/GDR2” update and it is a huge step toward making digital photography easier.
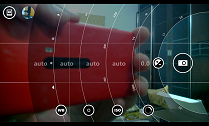
Its UI is easy and very cooperative with lots of tricks that make the experience a lot more easier, an interactive manual for every setting is available right in the app with a handy dictionary explaining photography jargon to get you started.

But even with Nokia Pro Cam’s ability to preview end results, and its cute little red warnings that your picture may become ruined.
It might still be over whelming for some to get the best shot of their subjects, and this is where this article comes into play through this step by step procedure:
- Take a photo in Auto mode, personally I discourage using flash, focus assist comes in handy if you’re shooting a night time closeup but otherwise its useless and irritating to everyone.
- Be sure to use a Framing Grid, the option is located at “…” > Settings > Framing Grid. Rule of thirds is a very attractive grid and its the most recommended.
- In this procedure we’ll take two or more shots so when you frame your shot make sure to use the grid as a frame of reference for the next shot (so you wouldn’t get a different scene in the next photo)
- Don’t go for subject-less shots almost no one wants to look at your backyard for the sake of it, your subject doesn’t have to be beautiful but it has to be a little bit meaningful.
- Examine the reasons why you hate the picture? too much light? underexposed? too blurry? too noisy?screwed up colors? and so on.
- Open that photo in Nokia Pro Cam, and click on the 3 dots “…” then choose “PICTURE INFO”
- Look for two values in particular : Shutter Speed, ISO.
- Open Nokia Pro Cam and take a new picture using the same settings auto suggested and then change the value related to your problem to your liking. Â (Don’t use auto mode again in the next picture instead mimic the data found in your picture info. because auto mode can spit out different results)
Solving common problems:
- If your photo turned out blurry let the shutter speed be faster eliminating the chances of hand shakes. ( don’t change values radically a 1/8 shutter speed is very different from a 1/4 shutter speed.)

- If your photo is very dark and/or noisy try putting some effort in a home made rig that holds your phone still, Nokia thought of your input shaking the camera so it made a delayed shutter button option Nokia Pro Cam > … > Shutter delay. This way you could set the shutter time for 4s without creating unwanted shadows or light trails.

- If you want a long exposure photo (traffic light trails) but there’s too much street light your picture could become over exposed, use the lowest ISO setting possible, to have a darker result use a sun glasses over the lens to reduce the light even further.
- If your problem is an over exposed portion of the pic try leaving all the settings the same as auto but dial down exposure compensation. (works great for shooting the moon and other light based subjects like city lights.)
- If your subject isn’t standing out in your picture, use the same settings but with manual focus, and if you have too many subjects just use the infinity focus (its the infinity sign in the manual focus dial) this mode will work great for group/kids photo setting because you’ll not have to wait for a focus lock.

- If you want extreme close up use the manual focus dial and try not to move your phone out of focus by accident.

- If your daylight pictures are a little blurry for your liking, make sure to use (infinity) in your manual focus dial, also try  to limit your handshakes and use a very fast shutter speed.

- If colors are not accurate change the white balance to the most accurate setting.
- If you want to create an amazing long shutter image with your friends consider forcing flash to get your friends body (the room should be dark) and then let him go crazy with a light source anything from a led light to a full light saber. ( this way you get your friend’s pic and the cool light effects with it)

- Try to take advantage of your miss advantage in some situations, some neat stuff pics could be had by being a little bit creative

- CLEAN YOUR LENS, solves most problems specially at night.
Disclaimer: All the photos above were taken in a pre-amber Lumia 920, they were taken using Proshot App which has almost all of the advantages the Nokia Pro Cam offers now and some more too.
If you’re interested in the full versions of the above pictures click here.
I’ll try to answer any photography questions in the comments to the best of my ability and if the question is hard but interesting enough, I’ll try pass it on to some friends who do know what they’re talking about.
Thanks for reading and have a good day.
Category: Applications, How to:, Lumia, Nokia, PureView
About the Author (Author Profile)
I love mobile photography, I have a serious 8 years relationship with Nokia , and a love/hate affair with Microsoft. you can follow me on twitter @nabkawe5Subscribe
If you enjoyed this article, subscribe to receive more just like it.


Connect
Connect with us on the following social media platforms.